Install by cloning from another Tails on Mac
You need
1 USB stick
Only for Tails!
8 GB minimum
Your primary Tails
1 USB stick
All data will be lost!
8 GB minimum
Windows 8
or later
macOS 10.10
Yosemite
or later
Linux
any distribution
Debian
Ubuntu
or another derivative
Another Tails
USB stick or DVD
Intel processor
not Apple processor
Smartphone
or printer
to follow the instructions
1 hour in total
½ hour
¼ hour
1.9 GB to download
½ hour to install
½ hour to upgrade
To learn about the processor in your Mac, choose Apple menu ▸ About This Mac and check the Processor or Chip information.
If your Mac has an Apple chip, Tails won't work.
Making Tails work on Apple chips represents a massive engineering challenge.
The Asahi Linux project is working on support for Apple chips in Linux. Support for Apple chips in Debian is following along, but it is not complete yet.
You can track our own experiments on #10972.
System requirements and recommended USB sticks
System requirements
Tails works on most PC computers that are less than 10 years old.
Tails does not work on:
- Mac computers with an Apple processor (M1, M2, and so on)
- Smartphones or tablets
- Raspberry Pi
Tails might not work on some PC computers, for example, if their graphics card is incompatible with Linux. Nvidia or AMD Radeon cards often do not work in Tails.
See our list of known hardware compatibility issues.
Detailed hardware requirements
3 GB of RAM to work smoothly.
Tails can work with less than 3 GB RAM but might experience reduced performance, instability, or crashes.
The ability to start from a USB stick or a DVD reader.
A 64-bit x86-64 IBM PC compatible processor.
Recommended laptops
Laptop models evolve too rapidly for us to be able to provide an up-to-date list of recommended hardware. Below are some guidelines if you, or your organization, are considering acquiring a laptop dedicated to running Tails.
For PC
Avoid "gaming" models with Nvidia or AMD Radeon graphics cards.
Consider buying a refurbished laptop from a high-end (professional) series. These are cheaper and will last longer than new but lower-quality laptops.
For example, the Lenovo ThinkPad series work well with Tails, including the X250, X1 Carbon, T440, T480, and T490 models.
If you live in a part of the world where buying refurbished laptops is uncommon, look on eBay and Amazon. Amazon offers a 90-day Amazon Renewed Guarantee.
Consider buying a new laptop from vendors who guarantee the compatibility with Linux and Tails like ThinkPenguin.
For Mac
Tails still works on some older Mac computers with an Intel processor.
Unfortunately, we don't know of any Mac model that works well in Tails and can run the latest macOS version.
Recommended USB sticks
You need a USB stick of 8 GB minimum to use Tails.
All the data on this USB stick is lost when installing Tails.
The quality of your USB stick is crucial when using Tails. A bad USB stick will be slower and more likely to corrupt the files in your Persistent Storage.
We recommend that you:
Buy new USB sticks.
USB sticks become slower and less reliable over the years. Older USB sticks were also built with slower technology.
Buy USB sticks from well-known brands, such as Kingston, Samsung, and SanDisk.
Generic brands are more likely to be slower and less reliable.
Any modern USB stick from a well-known brand is fast enough to use Tails comfortably.
Buy your USB sticks from a reputable local store.
If you are in a place where counterfeit electronics are common, buy your USB stick from an international supermarket chain, which should have a more reliable supply chain.
Avoid buying USB sticks online or using USB sticks that were given to you, because they could contain malware.
In 2020, the FBI warned US companies to avoid USB sticks received by mail because some of them contained malicious software, such as BadUSB.
Consider buying faster USB sticks that support USB version 3.0 or later.
Check the specifications of your computer to determine whether your USB ports support USB 3.0 or later. USB 3.0 ports are sometimes blue.
USB 3.0 can be up to 10 times faster than USB 2.0. USB 2.0 has a maximum read speed of around 50 MB/s on USB sticks, while USB 3.0 has a maximum read speed of around 500 MB/s.
Most quality USB sticks nowadays have read speeds of at least 100 MB/s and are faster when used on USB 3.0 ports. Some USB sticks advertised for USB 3.0 have even greater speeds.
You can test the write speed of your different USB sticks by comparing the time it takes to clone Tails, for example.
How many USB sticks should I buy?
If you want to store personal files and configuration in an encrypted Persistent Storage, we recommend that you buy 2 USB sticks, ideally 3:
1 USB stick to be your primary Tails.
1 USB stick of the same size to be your backup Tails, if you use the Persistent Storage.
We recommend that you create a backup Tails by cloning your primary Tails, including its Persistent Storage.
1 USB stick to do manual upgrades on a few occasions when automatic upgrades are not available.
This USB stick can be of a smaller size and worse quality.
Your steps
Download Tails

Download Tails

Download the upgrade

Verify your download

Verify your download

Verify your download

Restart on the other Tails
Download Rufus
Install balenaEtcher

Download Rufus

Install balenaEtcher
Install Tails using Rufus
Install Tails using balenaEtcher
Install Tails using GNOME Disks
Install Tails using dd
Install intermediary using Rufus
Install intermediary using balenaEtcher
Install intermediary using GNOME Disks

Install intermediary using GNOME Disks

Restart on your Tails USB stick
Restart on intermediary

Restart on intermediary
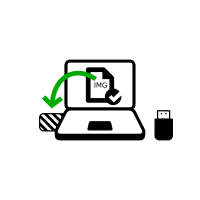
Install Tails by cloning
Upgrade your primary Tails by cloning
Restart on your new Tails

Welcome to Tails!
Well done!
You have installed Tails on your USB stick.
In the next step, you will make your computer start on this USB stick.
Tails might not work on your computer, so good luck!
If you already started on the other Tails, go directly to step 3: Verify that the other Tails is up-to-date.
Open these instructions on another device

In the next step, you will shut down the computer. To be able to follow the rest of the instructions afterwards, you can either:
Scan this QR code on your smartphone or tablet:


Print these instructions on paper.
Take note of the URL of this page:
https://tails.net/install/windows?back=1
https://tails.net/install/mac?back=1
https://tails.net/install/linux?back=1
https://tails.net/install/expert?back=1
https://tails.net/install/clone/pc?back=1
https://tails.net/install/clone/mac?back=1
https://tails.net/doc/upgrade/tails?back=1
https://tails.net/doc/upgrade/windows?back=1
https://tails.net/doc/upgrade/mac?back=1
https://tails.net/doc/upgrade/linux?back=1
https://tails.net/doc/upgrade/clone?back=1
Restart on the intermediary Tails
Restart on the other Tails
Restart on your Tails USB stick

Make the computer start on the USB stick
-
Make sure that you have installed Tails using either:
Select the Start
 button.
Press and hold the Shift key while you select the Power
 button
and then Restart.
button
and then Restart.Windows shuts down and restarts on the Choose an option screen.
In the Choose an option screen, choose Use a device.
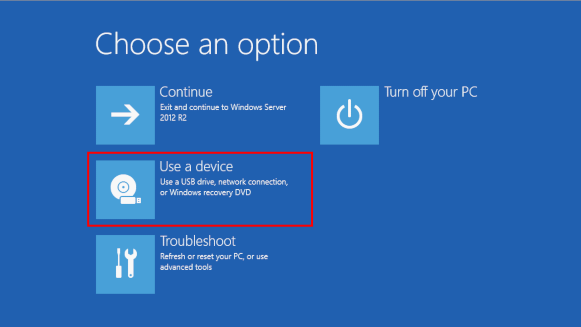
If the Choose an option screen or the Use a device option don't appear, refer to the instructions on starting Tails using the Boot Menu key.
In the Use a device screen, select USB HDD.
Windows shuts down and the computer restarts on your Tails USB stick.
In the future, we We recommend that you only plug in your Tails USB stick while Windows is shutting down. Otherwise, a virus in Windows could infect your Tails USB stick and break its security.
Such an attack is possible in theory but very unlikely in practice. We don't know of any virus capable of infecting Tails. See our warning on plugging Tails in untrusted systems.
If the computer starts on Tails, the Boot Loader appears and Tails starts automatically after 4 seconds.
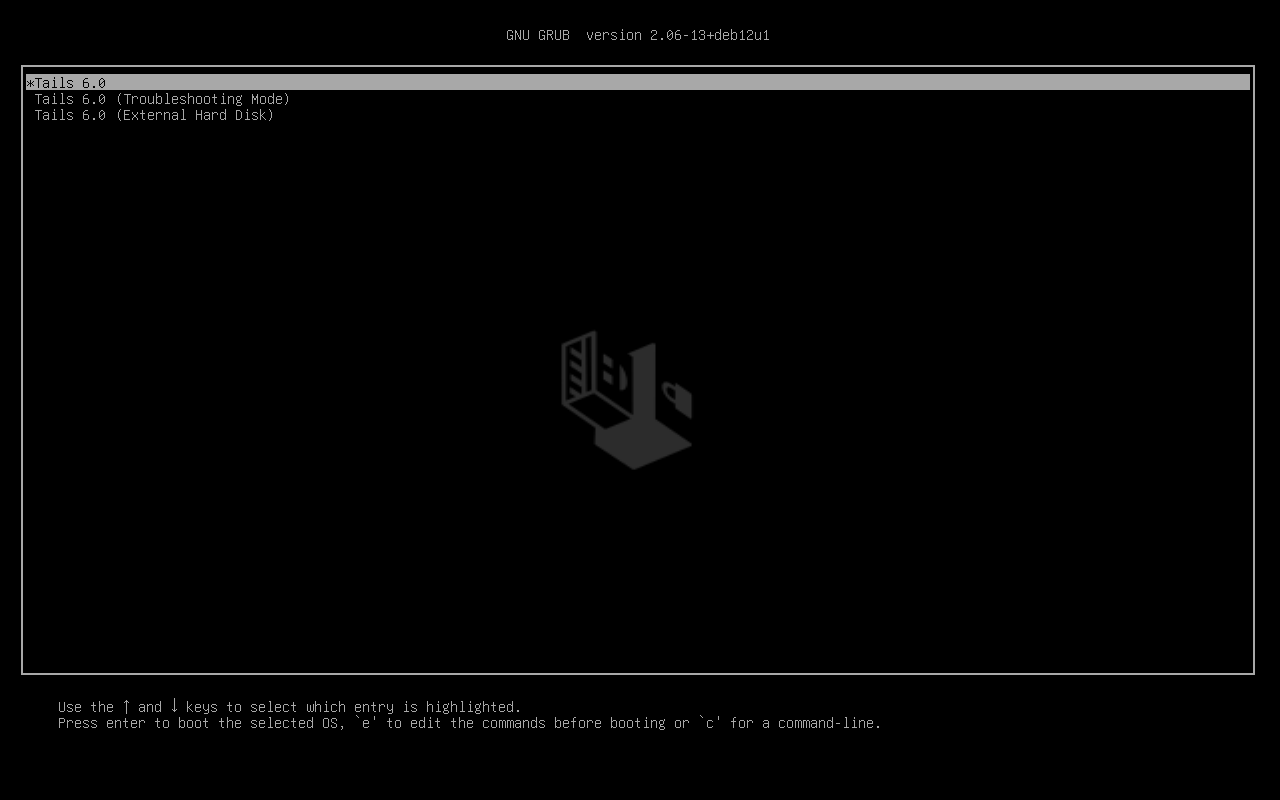
The Troubleshooting Mode entry disables some features of the Linux kernel and might work better on some computers. You can try this option if you think you are experiencing hardware compatibility errors while starting Tails.
The External Hard Disk entry makes it possible to start from an external hard disk and some problematic USB sticks.
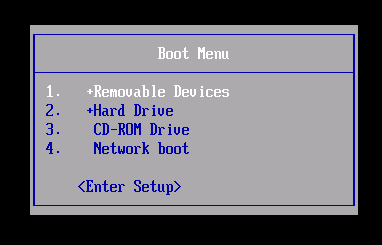
Most computers do not start automatically on the Tails USB stick, but you can press a Boot Menu key to display a list of possible devices to start from.
If Windows is also installed on the computer, you can refer instead to the instructions on starting Tails from Windows. Starting Tails from Windows is easier than using the Boot Menu key.
The following screenshot is an example of a Boot Menu:
This animation summarizes how to use the Boot Menu key to start on the USB stick:
The following instructions explain in detail how to use the Boot Menu key to start on the USB stick:
-
Make sure that you have installed Tails using either:
-
Shut down the computer while leaving the USB stick plugged in.
Shut down the computer and plug in the Tails USB stick.
Shut down the computer.
Plug in the other Tails USB stick that you want to install upgrade from.
Unplug your Tails USB stick while leaving the intermediary USB stick plugged in.
-
Identify the possible Boot Menu keys for the computer depending on the computer manufacturer in the following list:
Manufacturer Key Acer F12, F9, F2, Esc Apple Option Asus Esc Clevo F7 Dell F12 Fujitsu F12, Esc HP F9 Huawei F12 Intel F10 Lenovo F12, Novo MSI F11 Samsung Esc, F12, F2 Sony F11, Esc, F10 Toshiba F12 Others… F12, Esc On many computers, a message is displayed very briefly when switching on that also explains how to get to the Boot Menu or edit the BIOS settings.
-
Switch on the computer.
Immediately press several times the first possible Boot Menu key identified in step 2.
-
If the computer starts on another operating system or returns an error message, shut down the computer again and repeat step 3 for all the possible Boot Menu keys identified in step 2.
If a Boot Menu with a list of devices appears, select your USB stick and press Enter.
If the computer starts on Tails, the Boot Loader appears and Tails starts automatically after 4 seconds.
-
Make sure that you have installed Tails using either:
-
Shut down the computer.
Shut down the computer while leaving the USB stick plugged in.
Plug in the other Tails USB stick that you want to install from.
-
Plug in your Tails USB stick.
-
Switch on the computer.
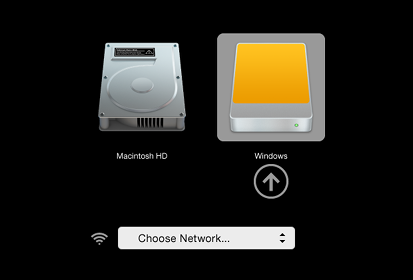
Immediately press-and-hold the Option key (⌥ or Alt key) when the startup sound is played.
Hold the key pressed until a list of possible startup disks appears.

-
Choose the USB stick and press Enter. The USB stick appears as an external hard disk and might be labeled EFI Boot or Windows like in the following screenshot:
If the USB stick does not appear in the list of startup disks:
Wait 2–3 minutes and try again. Some USB sticks need some rest after installing.
Try all other USB ports on the computer. Some USB ports cannot be used to start from.
Make sure that you have installed Tails using either:
Make sure that you have verified your download of Tails.
Make sure that you have verified your download.
-
Try to install again on the same USB stick.
Try to install again on the same USB stick.
Try to install again on the same USB stick.
Try to install again on the same USB stick.
Try to install again on the same USB stick.
Try to install again on the same USB stick.
Try to install again on the same USB stick.
Try to install again on the same USB stick.
Try to install again on the same USB stick.
Try to install again on the same USB stick.
Try to install again on the same USB stick.
Try to install again on the same USB stick.
Try to install on a different USB stick.
Try to use the same USB stick to start on a different computer.
If your computer still does not display the Boot Loader, it might currently be impossible to start Tails on your computer.
-
If your Mac displays the following error:
Security settings do not allow this Mac to use an external startup disk.
Then you have to change the settings of the Startup Security Utility of your Mac to authorize starting from Tails.
To open Startup Security Utility:
Turn on your Mac, then press and hold Command(⌘)+R immediately after you see the Apple logo. Your Mac starts up from macOS Recovery.
When you see the macOS Utilities window, choose Utilities ▸ Startup Security Utility from the menu bar.
When you are asked to authenticate, click Enter macOS Password, then choose an administrator account and enter its password.
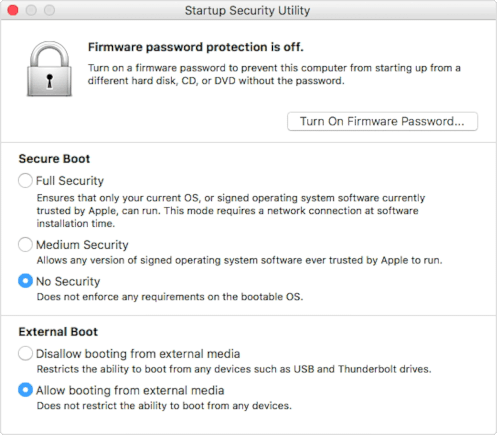
In the Startup Security Utility:
Choose No Security in the Secure Boot section.
Choose Allow booting from external media in the External Boot.
To still protect your Mac from starting on untrusted external media, you can set a firmware password, available on macOS Mountain Lion or later. A firmware password prevents users who do not have the password from starting up from any media other than the designated startup disk.
If you forget your firmware password you will require an in-person service appointment with an Apple Store or Apple Authorized Service Provider.
Read more on Apple Support about:
If the computer starts on Tails, the Boot Loader appears and Tails starts automatically after 4 seconds.
The Troubleshooting Mode entry disables some features of the Linux kernel and might work better on some computers. You can try this option if you think you are experiencing hardware compatibility errors while starting Tails.
The External Hard Disk entry makes it possible to start from an external hard disk and some problematic USB sticks.
Troubleshoot Tails not starting
-
If the computer doesn't restart on your Tails USB stick:
Wait 2–3 minutes and try again. Some USB sticks need some rest after installing.
Try other options in the Use a device screen, for example USB FDD if available.
Try all other USB ports on the computer. Some USB ports cannot be used to start from.
Refer to the instructions on starting Tails using the Boot Menu key.
-
If none of the possible Boot Menu keys from the previous technique work, refer to the troubleshooting instructions about Tails not starting at all.
-
If the Boot Menu appears, but your USB stick is not listed in the Boot Menu:
Wait 2–3 minutes and try again. Some USB sticks need some rest after installing.
Try all other USB ports on the computer. Some USB ports cannot be used to start from.
-
If the computer restarts on your Tails USB stick, but the Boot Loader doesn't appear:
If your USB stick is listed in the Boot Menu, but the Boot Loader doesn't appear:
If your USB stick appears in the list of startup disks, but the Boot Loader doesn't appear:
Wait 2–3 minutes and try again. Some USB sticks need some rest after installing.
Try all other USB ports on the computer. Some USB ports cannot be used to start from.
Make sure that you have installed Tails using either:
Make sure that you have verified your download of Tails.
Make sure that you have verified your download.
-
Try to install again on the same USB stick.
Try to install again on the same USB stick.
Try to install again on the same USB stick.
Try to install again on the same USB stick.
Try to install again on the same USB stick.
Try to install again on the same USB stick.
Try to install again on the same USB stick.
Try to install again on the same USB stick.
Try to install again on the same USB stick.
Try to install again on the same USB stick.
Try to install again on the same USB stick.
Try to install again on the same USB stick.
Try to install on a different USB stick.
Try to use the same USB stick to start on a different computer.
If your computer still does not display the Boot Loader, it might currently be impossible to start Tails on your computer.
-
If the Boot Loader appears, but Tails fails to start after the Boot Loader, refer to the troubleshooting section about Tails not starting after the Boot Loader. the troubleshooting section about Tails not starting after the Boot Loader.
Starting the computer using a Boot Menu key can be faster than starting the computer on Windows first and then on Tails. We recommend you learn how to start Tails using the Boot Menu key if you use Tails regularly.
Apple does not prioritize collaborating with Free Software projects. Their newest hardware is usually very hard for Free Software developers to get working with Linux, and thus Tails. PC hardware tends to be more open and work better with Linux.
Welcome to Tails!
Starting the intermediary Tails
Starting the other Tails
After the Boot Menu, a loading screen appears.

One to two minutes after the Boot Loader and the loading screen, the Welcome Screen appears.
If the following message about partitioning errors appears in the Welcome Screen, please start again from step 2: Verify your download.
Errors were detected in the partitioning of your Tails USB stick.
If the error persists, reinstall Tails on one of our recommended USB sticks.
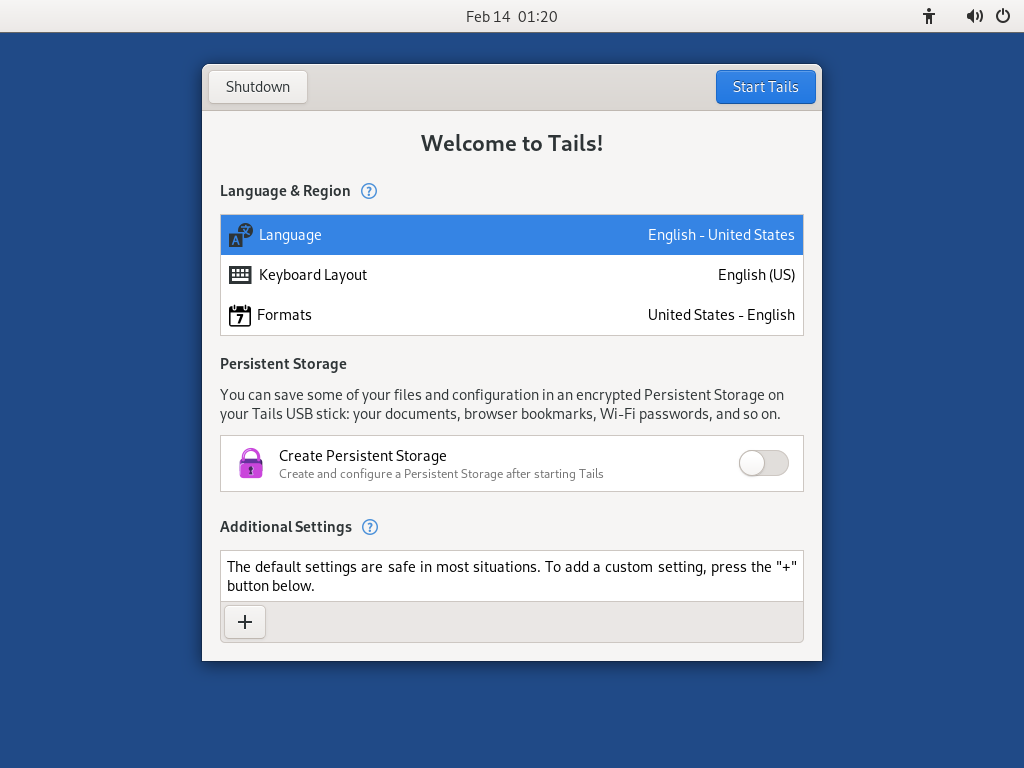
In the Welcome Screen, select your language and keyboard layout in the Language and Formats section. Click Start Tails.
If your keyboard or touchpad doesn't work, try using a USB keyboard or mouse.
After 15–30 seconds, the Tails desktop appears.

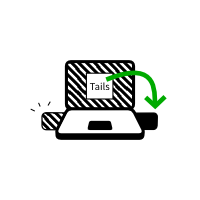
Verify that the other Tails is up-to-date
To prevent installing upgrading to an outdated version of Tails with known security issues, make sure that the Tails you are installing upgrading from is up-to-date:
Choose Apps ▸ Tails ▸ About Tails.
Verify that you are running Tails 7.10 released on 2026-07-23:
If you are running Tails 7.10 , continue with the next step.
If you are not running Tails 7.10 , click Check for Upgrades.
Apply all upgrades as requested.
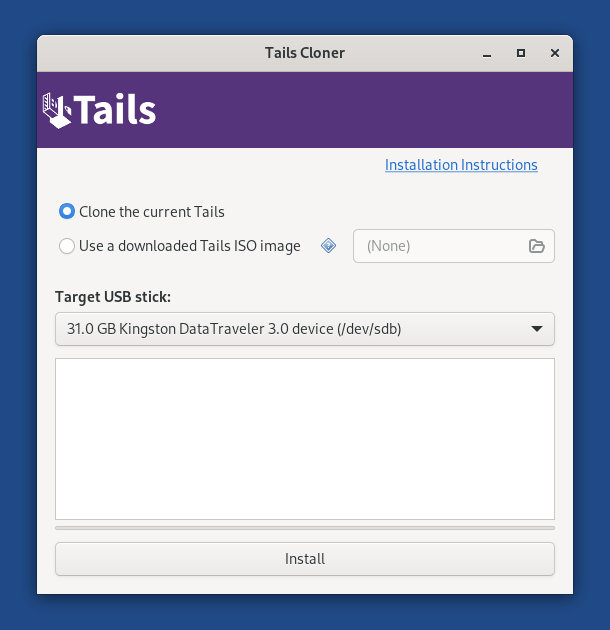
Install Tails by cloning
Upgrade your primary Tails by cloning
In this step, you will upgrade your primary Tails from the other intermediary Tails using Tails Cloner.
Plug the new your primary Tails USB stick in addition to the other intermediary Tails into the computer.
All the data on this USB stick will be lost.
Some data might still be recovered using advanced forensics tools.
Choose Apps ▸ Tails ▸ Tails Cloner to open Tails Cloner.
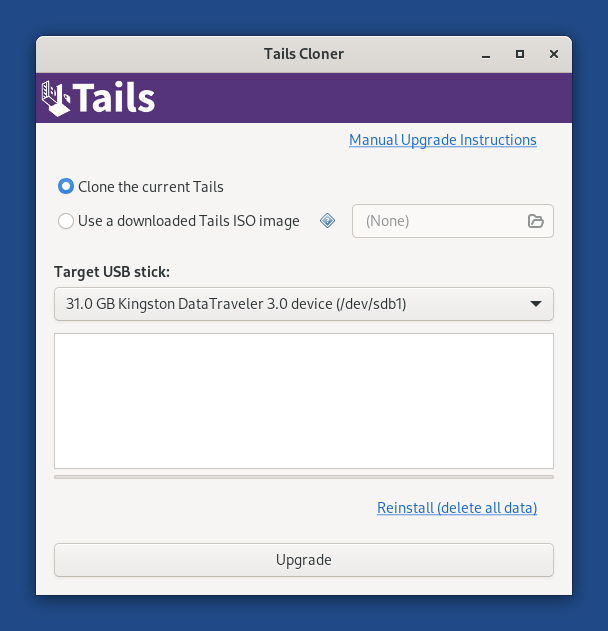
If the other Tails has a Persistent Storage, another option Clone the current Persistent Storage is available.
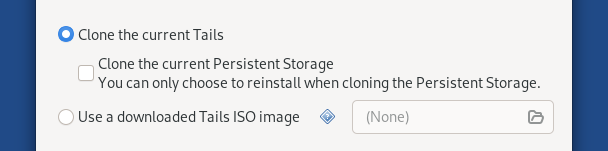
If you select the option Clone the current Persistent Storage, the Persistent Storage of the other Tails is also be copied. The Upgrade button becomes unavailable and you can only reinstall and delete all data on the target USB stick.
In the future, we want to allow cloning the Persistent Storage when upgrading as well, for example to make it quicker to update a backup Tails USB stick. (#20362)
Choose the new your USB stick in the Target USB stick menu.
To start the installation, click on the Install button. upgrade, click on the Upgrade button.
Read the warning message in the confirmation dialog.
Click Delete All Data and Install to confirm.
The installation upgrade takes a few minutes.
The progress bar usually freezes for some time while synchronizing data on disk.
After the installation upgrade finishes, close Tails Cloner
You made it!
You are done upgrading Tails. You can now restart on your primary Tails USB stick.
Congratulations on staying safe :)
Read the release notes of Tails 7.10 to see what's new.
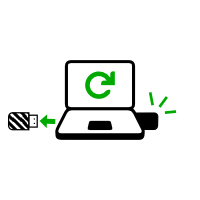
Restart on your new Tails
Shut down the computer.
Unplug the other USB stick and leave the new USB stick plugged in.
Switch on the computer and start on your new Tails USB stick.
The Boot Loader appears and Tails starts automatically after 4 seconds.
After 30–60 seconds, the Welcome Screen appears.
If the following message about partitioning errors appears in the Welcome Screen, please start again from step 4: Install Tails by cloning.
Errors were detected in the partitioning of your Tails USB stick.
If the error persists, reinstall Tails on one of our recommended USB sticks.
In the Welcome Screen, select your language and keyboard layout in the Language and Formats section. Click Start Tails.
After 15–30 seconds, the Tails desktop appears.
Welcome to your new Tails!
You made it!
You managed to start your new Tails on your computer!
Congratulations on staying safe :)
To continue discovering Tails, read our documentation.
Test your Wi-Fi
Problems with Wi-Fi are unfortunately quite common in Tails and Linux in general. To test if your Wi-Fi interface works in Tails:
Open the system menu in the top-right corner:
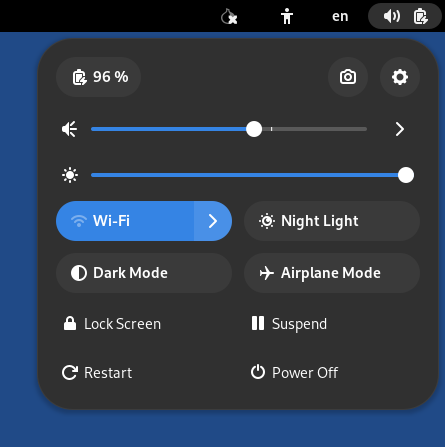
Click
 on the
right of the Wi-Fi button.
on the
right of the Wi-Fi button.A list of available Wi-Fi networks appears below the Wi-Fi button.
After establishing a connection to a local network, the Tor Connection assistant appears to help you connect to the Tor network.
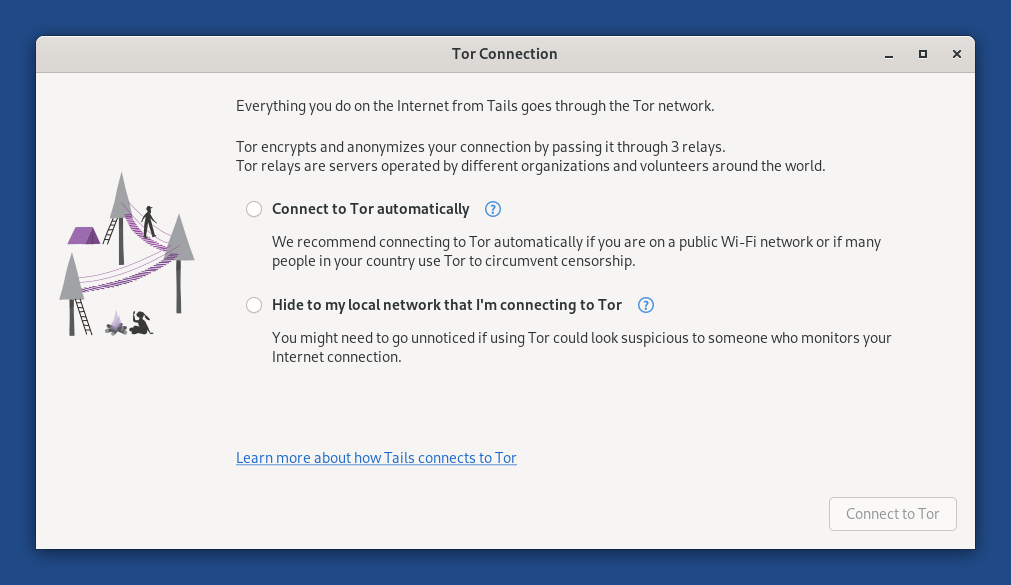
To learn more about the Tor network, go to Connecting to the Tor network.
Troubleshooting Wi-Fi not working
If your Wi-Fi interface is not working, you might experience the following:
There is no Wi-Fi menu in the system menu:
There is a Wi-Fi menu in the system menu, but connecting to a Wi-Fi network fails.
The interface is disabled because MAC address anonymization failed:
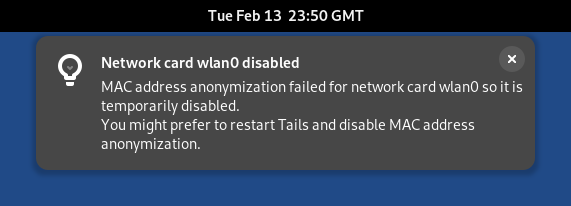
In this case, you can disable MAC address anonymization in the Welcome Screen. Doing so has security implications, so read carefully our documentation about MAC address anonymization.
The following notification appears:
Activation of network connection failed
To connect to the Internet, you can try to:
Use an Ethernet cable instead of Wi-Fi if possible. Wired interfaces work much more reliably than Wi-Fi in Tails.
Share the Wi-Fi or mobile data connection of your phone using a USB cable. Sharing a connection this way is called USB tethering.

See instructions for:
-
Only sharing mobile data works on iPhones and iPads; sharing Wi-Fi does not work.
Tails cannot hide the information that identifies your phone on the local network. If you connect your phone to a:
Wi-Fi network: the network can see the MAC address of your phone.
This has security implications that we explain in our documentation on MAC address anonymization. Some phones have a feature to hide the MAC address of the phone.
Mobile data network: the network is able to know the identifier of your SIM card (IMSI) and the serial number of your phone (IMEI).
-
Buy a USB Wi-Fi adapter that works in Tails:
Panda Wireless Ultra ($25)
ThinkPenguin TPE-N150USB ($64)
- Check in our list of known Wi-Fi issues if there is a workaround to get your Wi-Fi interface to work in Tails.